Alas, it's the end of the line for my 1999 Dutchmen 1004D, which has been a good friend since I bought it in 2019 to use primarily at Oshkosh for the airshow. The rest of the time I rented it out.
A month or so ago, a couple of guys were in a hurry to get out of Minnesota's Boundary Waters Canoe Area Wilderness. The mosquitoes were eating them alive and the rain was constant. Despite warnings to go through the step-by-step process I provided in the Camper Guide, they decided to wing it.
They didn't flip the hitch safety latch down and pin it, and they didn't attach the safety changes.
A few miles down the dirt road from the campground, ye olde camper fell off their vehicle. It could have been catastrophic for them and/or anybody else on the road if they'd made it to the highway.
At the time, I checked things in the front and it was all good. I should have gotten underneath. I would've seen the "tow frame" was cracked near the weld to the camper frame. And a couple of subsequent trips by renters flexed it to the point it was pretty much broken save for a small thread keeping it together. That's a very dangerous situation.
I'll miss the camper. Moreover, I'll miss the nice people I've been in the last four years.
In the spring, I'll offer it for free to anyone who enjoys rehab projects and knows how to weld.
It was a quiet off-season for ye olde camper. I didn't have any major repairs to do and most of the puttering work was completed in the fall. There's always a few things to try to improve on and I continue to do that from time to time; little things that sort of bug me.
For example, there's the door, which is a sing-down version that is stowed by being clamped to the ceiling when the pop-up is folded up. It's not a particularly good design and what happens is all the jostling on the drive to the campground shakes the thing off and it rides on top of the front bunk mattress.
Then, if you're not paying attention and noticed the door came down, you pull the front bunk out and ...rippppp.... the sharp edges tear into the sheets and mattress.
Sure, I can always -- and do -- make a special note for people to check before pulling the front bunk out. And I've taken to putting the throw rug and a piece of foam on the mattress before closing up, but I'd really like to figure out is a way to keep it from falling in the first place. And I haven't yet. Let me know if you've seen some clever method of doing this.
Meanwhile, there are changes afoot in the plan for this summer. I'm closing the rental period in mid-August instead of October.
My sister, Wendy, who lives in Vermont, has leukemia and has been undergoing blood transfusions on a regular basis. She's scheduled for a bone marrow transplant in mid-summer at the Dana Farber Cancer Institute in Boston. The odds aren't particularly in her favor, but the transplant surgeon won't go ahead unless there is someone to take care of her 24/7 for months afterward.
And so, I'm moving to Boston for three months to be that person. The camper is rented through August 16. When it returns, I'll spend the night cleaning it and then pack it up and roll it back into the hangar, and start the drive to Boston the next morning.
Usually at this time of year, I start planning for what improvements to the little camper can be made during the off-season. Funds raised through camper rentals are ALL put back into the comfort and safety of the camper.
This was a good season so it was possible already to add the new stove.
But when a renter didn't pay attention to the step in the camper guide which says "be sure to check that the door hasn't swung down onto the bunk pad before attempting to pull the bunks out", I knew I had the next improvement: new mattresses.
So I found ones with a slightly thicker pad but which use a dense foam rather than the old foam in the old mattresses. Super comfortable!"
Now that doesn't mean you shouldn't check on the door before pulling out the bunks; these will actually rip easier than the old mattresses.
The camper at Whitewater State Park. Photo by Sarah Donovan. 2022.
For awhile now I've been trying to think of a way to provide some sort of guarantee that the weather will cooperate when you're off camping with the Dutchman. I know, right? So is everyone else.
I thought about building an insurance pool that could be used to refund campers when they get rained out and come home early, but there's no guarantee it could be large enough.
This weekend it hit me. I love repeat campers. First, of course, they're really nice people I've already gotten to know. Second, they're not much work. They already know the camper. They pull up, hook up, sign the paperwork and off they go.
So, I decided I would just guarantee good weather to repeat campers and foot the bill because (a) they're nice people and (b) they're not much work.
As it stands now, when you come early (and this applies to all campers), I usually ask Outdoorsy to credit you for unused insurance days and to rebate the portion of your fee that actually comes to me (note: it's not that much). Outdoorsy does not refund their fees. That's on them.
Under my new plan for returning renters, if bad weather forces you to return early, you will, of course, still get a refund directly from Outdoorsy for the unused days. But I will also send you a check for the difference between what is refunded and what you paid in total.
Here's how that works in practice:
Let's say you have a weekend rental. Two nights for $170. You'd probably also pay $15 for tax, $39 for insurance, and $16 for Outdoorsy's fee for a total of about $240 (note: These figures are hypotheticals).
A day later, it's raining and cold and the kids are rebelling. Just come home.
Typically, I'd refund about $65 for my share (I told you it wasn't much) for the unused day, and Outdoorsy would refund about $18 for unused insurance and that's about it. You'd get $83 back from your original $240.
Under the "Favorite Renters" option, I give you an additional $157.
There are common sense stipulations. The weather really has to stink. A passing shower isn't an invitation to get free use of the camper, of course. And the camper has to be returned in the same condition in which it left. Again: of course.
But this seems like a good way to reward my favorite people and insure that if they don't have a good time, at least they don't have to have an expensive one.
"Bob, does only one burner on the stove work?" the text message one weekend recently said.
"Not that I'm aware of," I replied. And I should know because I was the last person to use it when I took the camper to the EAA convention and airshow at Oshkosh.
"The left knob doesn't turn," said the reply.
That's when ordering a new stove seemed like a good idea. I don't know if the old one was original equipment or not but it seemed to me that the rubber gas line alone was near the end of its useful life (in aviation, we replace fuel lines every five years).
So I ordered a new stove ($400!) and while it took some work to rebuild parts of it, given that it had obviously been assembled by someone at 4:55 pm on a Friday, it came out fine.
I also replaced the gas line and the connector to the camper gas line. Remember how the old stove connector really had to be jammed into the connector? It turns out that these fittings are not universal so it's best to replace both halves of the fitting. Mission accomplished.
Setup is pretty easy.
Align the midpoint of the stove frame with the mark on the metal attach point on the camper.
Connect the top part of the metal bracket on the stove with the bottom part of the metal bracket on the camper.
Insert the support rod in the bracket on the camper and attach to the bracket underneath the stove.
Insert the gas line fitting of the stove into the connector on the gas line coming out of the camper by pulling back the collar on the camper fitting, then swing the locking lever (which turns on the gas) so that it is parallel to the fitting.
Light the stove with a match or lighter (there may be one in the utility cabinet).
The stove should only be used outside. There is a gas line behind the sink but presently that fitting is not compatible with the stove.
By the way, if you intend to use the awning (you should!), do not set it up with the stove in place.
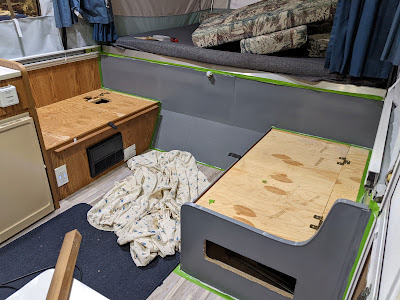
It took a lot longer than I had anticipated, mostly because I wimped out on some cold days, but the upgrading of the interior has been completed, featuring a mix of grays that lines up nicely with the floor and tent.
Behold!
As long as it was a nice day, the big door at the hangar was open, and Mary Lucia's final show was providing musical motivation, I also put the new tent piece on. It's a bit of a struggle to get it right but it came out just great.
You'd never guess that it's the same piece that was shredded last summer when a camper raised the roof slightly to retrieve an item his daughter had left behind. When he pushed the front bunk back in, it tore the screen and vinyl. But the company over in Wisconsin that made the original replacement (installed just last spring) did an outstanding job.
It's been a generally quiet rental season so far, thanks, I suspect, to the cold Minnesota spring and my reserving of a number of summer dates for my own use. But a less frenetic season may not be such a bad thing.
Here's hoping you enjoy your summer, should it ever get here.
I'd hoped to be well underway in doing some remodeling of the Dutchman's interior but it's been too cold to work out at the hangar this winter. I used to like working in the cold weather but I was a younger man back then, I guess.
But we had a warm spell last week -- it got up to 30 -- so I at least got started, taping off a few sections and priming the old "faux wood" paneling. It doesn't look like much at the moment, I admit. But eventually it'll be a deep grey/blue, which should match the flooring better as well as the upholstery (which I wouldn't mind also updating if I knew how to do it).
The renter-damaged tent panel next to the door returned from the Wisconsin company that does these sort of repairs (same place I bought the all-new tent portion last spring), and I was pretty amazed at their work. The screen was completely replaced where it was ripped and I can't tell anything happened to the vinyl, and there's a new rubber channel along the bottom that slides onto the camper frame. The old one -- one year old -- had split. It takes some abuse in raising and lowering the camper, so I had the company sew some velcro to the bottom to take the pressure off that channel. We'll see how it works.
I'm still trying to find a suitable faucet for the sink but have had no luck so far. The old, cheap faucet isn't made anymore or is out of stock everywhere. I wouldn't want it, anyway, as it leaked far too much.
I'm still planning to add a new sunscreen/canopy, and I've also purchased a vinyl "rug" to place just outside the door.
As weather warms, I'll be working on the usual infrastructure -- wheel bearings and such.
I have no idea what the coming camping season will bring, how availability in state parks will match up to last year's tight squeeze, but I've opened up reservations for 2022 if you want to reserve some time now.
Black River Falls was a popular destination for the camper this year. Thanks to Brian for the picture.
The last renter of the season is out with the Dutchmen for a little fall foliage viewing. It's 29 degrees and I don't know how she does it even with a working furnace (although the battery won't last that long) and my donation of a Buddy Heater. Me? Frankly, I prefer the warm comfort of my bed with, perhaps, a faithful dog for extra heat.
It was a really great season. Again this summer I met terrific people.
Nineteen rentals was a new record. Almost every weekend was booked with the exception -- oddly enough -- of Labor Day weekend. And for the most part the weather cooperated too. The reviews submitted by campers were gratifying to read (See them here)
The Dutchmen is perfect for those weekend getaways, which is important because if you read the Facebook group associated with Outdoorsy RV owners, you'll be constantly told that just renting for a couple of days is too much work and not worth it.
Ah, the joys of being retired! It's fun puttering around the hangar and although cleaning can get a little tedious after you've done it 100 or so times, I enjoy hearing of the camping experiences of the people I meet. By and large, everyone seemed to have had a great time.
When the camper comes back, it's time to get started on its off-season regimen.
This winter, I hope to paint much of the interior; out with the '90s faux wood and in with combination of grays and blues, I think.
A panel of the new tent needs to come down and be sent back to Wisconsin for repair, the result of an attempt to retrieve a child's belongings without raising the roof all the way. That's a pricey fix although I didn't assess the actual cost. His heart was in the right place.
I also have to figure out what to do about the sink and faucet and whether it's worth it. Most people didn't seem to use the water tank or the faucet, which I had to remove because it leaked too much. They seemed to prefer the blue 7-gallong jug. So far, it's been impossible to find a replacement faucet, which has to be low profile (otherwise it hits the roof when it comes down) and pump action.
And even though most people didn't use the awning, I'll probably install a new one in the offseason. The old one looks pretty beaten up.
And, of course, there's the usual maintenance like replacing wheel bearings etc.
It'll give me something to do at the hangar. The airplane-building project is stalled because of the delay (chip shortage) in getting the avionics package delivered. Ordered it in May. It's almost November and still no sign of it. And what with a killer frost overnight wiping out the gardens, it's going to be up to the Dutchman to keep me out of trouble until spring.
The tentative plan is to open the 2022 camper season on May 1. I hope to see you then.
Among the last things I say to people as they're departing for their adventures is "don't lose Chris." Chris is -- or at least was -- the crank that raises and lowers the roof and is, arguably the most important piece in the whole operation.
It's easy to leave the crank in the winch and drive away. Or leave it in the winch and have it stolen. That's why Chris gets special attention.
The crank handle is always named after the last person to lose one. Chris, a good guy as I recall, rented the camper in 2019 when he lost the crank, whose name -- Arturo -- it had for only a couple of weeks.
It's been a good run for Chris but somewhere between here and Prairie du Chien lies Chris.
Toby, a good sport, left Chris in the winch and the rest, including Chris, is history.
The camper, shown at this year's gigantic AirVenture in Oshkosh. Even with thousands of people camping, the place offers more space than a lot of commercial campgrounds.
Even with the incredible heat this summer, demand for the Dutchmen has been the strongest ever. The biggest problem this year for people has been finding a place to camp. The most popular state parks are booked solid, which serves as a reminder to plan your summer trips during the winter for best results. I've already opened u, p the 2022 season for booking.
One of the illuminating aspects of renting the camper has been seeing the changing nature of "camping." When I was a kid, you put up a tent and lived pretty much by your wits. You quickly learned to do without the creature comforts and, despite our protestations, we found ways to entertain ourselves.
I fear that aspect of camping is disappearing fast, which is why I'm such a fan of Minnesota's state parks, which at least give you a little nature between you and the next campsite.
In early July, my wife and I visited her ancestral homeland of northern Vermont and we noticed that someone has built a new "campground" in the rural part of the so-called Northeast Kingdom. It's an area with mountains and spectacular views. This campground could've been a super place.
Instead, however, the developer basically created a large parking lot and jammed the big mobile rigs in side-by-side. Aside from the fact it wasn't an asphalt parking lot, err campground, it could've been a Home Depot parking lot.
Maybe that's not a big deal for the people in those big rigs with their slide out living rooms, bathrooms, showers and full kitchens, but that's not camping to my way of thinking. And it certainly isn't the environment to take a popup camper.
My guess is this will be more the exception rather than the rule across America, at least in campgrounds not run by the state or federal government. Too bad.
Do you have a favorite commercial campground that harkens back to your youth?
It's already been a season of high demand for the popup in the last few weeks with folks taking mostly weekend trips. But yesterday a renter in August canceled her reservation. Why? She couldn't find a campground.
It's hard to tell whether this is a growing problem, or whether people are trying to jam in a few "popular" spots and state parks while ignoring the rest. But anecdotal data surrounding the end of the pandemic at leasts suggests the demand for campground locations is outstripping their availability.
Coupled with a possible state shutdown, the post July-1 period could be rough for people who want to get away.
And that's another thing: Is it even possible to get away anymore at campgrounds?
I'm a big fan of Minnesota State Parks, not only because they're beautiful, but because they're respectful of the need for space. The private campgrounds? Not so much.
So a short article in today's St. Paul Pioneer Press is worth noting.
Too many campgrounds, it notes, are basically like Target parking lots with people jammed right into each other's personal spaces. This is even worse for people using pop-ups because the people who need to have air conditioning, satellite dishes, and a full-sized living room (the land yacht people) tower over their neighbors like midtown Manhattan skyscrapers.
Choosing the right place to camp requires plenty of research, which should begin in mid to late winter.
So campsitephotos.com seems to be a promising tool. You can look up what a campsite looks like before you decide whether it's for you.
The site is separated into state park sites available for Minnesota and a list of private campgrounds. But there are few pictures for the private campgrounds.
The site also has a Campground Assist function, which texts you when there are available sites. I can't vouch for whether it works.
If you plan on camping, I urge you to find a camping spot first, then book the Dutchman.
The camper went out on its first voyage of 2021 yesterday, after an off-season of constant work (or so it seemed) on maintenance items and improvements. She's looking pretty spiffy for a classic gal, I have to admit.
As you're probably aware, the camper is rented through Outdoorsy, a site not unlike AirBNB that handles all of the heavy lifting leaving me to only worry about, well, the actual heavy lifting. On an associated Facebook page, I'm constantly reading stories from other owners of RVs and, mostly, their horror stories.
Granted Outdoorsy is almost exclusively dominated by owners of these big gazillion dollar rigs and not by people who have a pop-up and put the time into it mostly as a hobby and something to do, but I'm always amazed by the lack of respect and interest in making people happy and, most importantly, just meeting new people.
I spent a few decades in the public radio business, mostly interviewing and writing about -- as Amy Klobuchar once described her father's work -- "ordinary people doing extraordinary things." So maybe I'm just predisposed to meeting interesting people and renting out a camper as a facilitator.
But it's what brings me pleasure so no apologies and no horror stories here.
I always invite people who are renting the camper to come out a few days or hours early to get to know the camper, but, more important, get to know me and I them. I'm always thrilled when people take me up on it and from what I can tell, people really appreciate the human aspect of the transaction.
So yesterday, Mary and Tom came out and I gave them a full demonstration of the camper and asked questions etc. By the time they left, they were obviously pretty comfortable with the unit and I had no qualms about watching it leave.
I also always enjoy showing people the airplane building project that's going on in the hangar and describing the history of Fleming Field.
Mary and Tom aren't doing any camping. Some family is coming up for a weekend and they'll use the camper as a spare bedroom. A novel idea.
Since I have to work the Twins game on Sunday, I'll save them the trouble of driving it back and I'll just go stop at their home and pick it up.
As always, I tell people, "you worry about the camping, I'll worry about the cleaning."
They seemed like lovely people and I feel pretty good having had the opportunity to have them in my life, if for only a few hours on a weekend.
You probably won't hear anything about it on Facebook, though.
As usual, I had big plans for the winter in terms of maintenance and improvements for The Dutchman. As usual, I sank into the Minnesota fetal position when the temperature dropped below 30 degrees. You know how it is, right?
Now that the cardinals are singing and the ice is melting, I'm quickly catching up.
As previously noted, the big project this year was the removal of the rear roof wood, which was rotted and leaking. That wasn't fun and all but before winter set in, that was completed. Today, I'm going to do a little more waterproofing of that section. Water and moisture is death to pop-up campers so, yeah, I probably have gone overboard on the waterproofing.
The big task this week has been putting up the new tent (the camper's windows and siding) which arrived from Canvas Replacements in Loyal, Wisconsin late last year, but which have sat in the box because I wasn't sure whether icy cold weather was a good time to be handling vinyl, which usually gets brittle in the cold. This product, I've since learned, is resistant to that sort of thing.
I couldn't be more impressed with the workmanship from this company and the replacement (so far, I've still got two sides to go) has fit perfectly. And, it's clean and gorgeous.
The other thing I wanted to do this winter was get underneath the camper and replace the steel cable that raises and lowers the camper roof. Maybe it could surive another year, but at 21 years old, do I want to take that chance? To me, it seemed like the cable was on borrowed time and I hate the thought that it could snap while a nice family was trying to have a fabulous weekend.
Yesterday, I decided that I'll let a pro handle it so I've made an appointment for next Wednesday for the nice people at Hilltop Camper and RV take care of it.
That leaves the only other thing on the list: Flooring and painting the interior. I'm going to wait on the painting and next week I'll see what the big deal is with peel and stick flooring (some pop-up camper owners seen to like it). That seems preferable to gutting the camper just to put down new flooring. We'll see. The only linoleum looks too much like, well, old linoleum.
I'm still on the fence about replacing the awning and am considering just removing it. Few people seem to use it.
We've already got our first rental request of the year and with things suddenly progressing faster than I thought, I may open up rentals to May 1 instead of June 1.
After a renter this summer ripped the side canvas, I decided now would be a good time to have all new canvas and vinyl sides made. So once Labor Day ended, it was an easy decision to stop the rental season, take down the old canvas, and bring it over to Wisconsin, where a company will make all new custom sides.
And that's just the start of the off-season improvements. Over the last few months, I notice stained water had begun running down the rear corners of the camper onto the canvas, a sign that water was getting into the wood. In addition, the rear board of the roof, where the canvas roof over the rear bed attaches, felt soft. Rot. A common problem in popups.
So I removed some vinyl covering and had a look. Not good.
It took a little bit of time to remove the trim and get to the problem. At first, I thought water was splashing on the top of the bed's roof and getting up under a rubber gasket. But once I got a look at things, I realized it must be coming through a seam that runs down the length of the roof.
Fortunately, all of the other boards that compose the sides of the roof are just fine. Getting the rotted wood off was a bear, however. Eventually I sanded down the final layer of wood, still bonded to the aluminum of the rear side of the roof, and reinforced it with some .020 aluminum scrap I had hanging around from one of my airplane construction projects.
The trick now will be to get everything back together and bonded. Once that's done. I'll seal up that seam, then use a roof sealant to reskin the entire roof. It should be great!
That's only one of the off-season maintenance projects. I still want to strip the interior out and replace the old linoleum, paint the interior from the faux wood look (what color should I use?), replace the awning, and replace the roof lift system and cables. That's in addition to the usual off-season maintenance like wheel bearings etc.
The canvas production should take about four months, which brings us to January. It'll be too cold then to put the sides back up (you risk cracking the vinyl windows when it's cold) so I'll probably wait until March.
That should give me plenty of time to get all the improvements done in time for the 2021 camping season. Reserve your week now!
Since no two people are alike, it's difficult to provide a one-size-fits-all camper checklist for things you'll need to bring to enjoy your camping trip with the Dutchman.
But in the theory that too much is better than too little, let's start with the list below, compiled by the Campers Inn RV blog.
Remember, the tow weight of your vehicle includes whatever you pack in your vehicle in addition to the weight of the Dutchman (Gross weight of the Dutchman is about 1900 pounds)
Keep in mind, too, that if you're loading the camper for your trip, distribute the weight evenly, with the bulk of it to the front. Otherwise, you risk swaying problems. I recommend all items go in a plastic tub.
Kitchen:
Water bottles
Cutting board
Utensils/cutting knives
Can opener
Tongs and skewers
Dish soap
Bowls, plates and cups
Paper towels and napkins
Garbage bags
Plastic wrap
Zip close bags
Potholders
Dish towels
Skillets and pots
Disinfecting wipes
Matches and lighter
Food storage container
Extra Cooler
Food staples:
Vegetables and fruits
Butter or margarine
Cereal
Condiments, including mayo, ketchup, mustard, relish, etc.
Grill meats, like hot dogs, burgers, brats, etc.
Drink mix packets
Eggs
S’more ingredients
Freeze dried meals
Salt, pepper, herbs and spices
Bread
Canned foods
Peanut butter and jelly
Snacks, including crackers, chips, pretzels, etc.
Cooking spray or oil
Soups
Clothing and bedroom items:
Hat
Rain gear
Shoes, including sneakers, hiking boots, sandals, etc.
Bathing suit
Sweatshirts and jackets
Socks
Underwear
Pants and shorts
Short and long sleeve t-shirts
Alarm clock (or smartphone)
Sewing kit
Towels
AdditionalSheets and blankets and/or sleeping bags
Pillows
Personal items and toiletries:
Phone chargers
Cash and credit cards
Campground reservation confirmations
Sunscreen
Bug spray
Batteries
Medications and prescriptions
Glasses or contact lenses
Sunglasses
Soap
Shampoo and conditioner
Brush and comb
Toothbrush
Toothpaste
Floss
Deodorant
Hair ties
Lotion
Makeup
Razor
Shaving gel
Scissors
Camping and outdoor fun gear:
Camera
Wood (best to purchase it at the campground. Don't bring any home)
Camping chairs
Hammock
Frisbee
Fishing gear, including rods, tackle, license, etc.
Sports equipment, including football, basketball, baseball, mitt, etc.
Yard games, including corn hole, horseshoes, hula-hoops, etc.
Although most of my posts here are aimed at people who are renting my Dutchmen camper, this one is for the hundreds of other popup camper owners who have experienced the problem of bent bed rails, mostly because someone didn't put support braces up before hopping in the bed (sure, blame the kids; that works).
That's what happened to the Dutchmen the other day (see previous post and pictures). I knew getting replacement parts would be difficult; it turns out it's impossible. Dutchmen doesn't sell the parts anymore and most RV dealerships -- even those who claim to sell and service popups -- really, don't. The big money is in motorized RVs, not tents on wheels. You simply cannot find the parts.
Those who bothered to answer my inquiries suggested PopUpParts.com but they don't have it and a check of dealers in Minnesota and Wisconsin turned up nothing from those who reponded. Most didn't bother.
That limits the possible fix to one: plan on doing a lot of work if this happens to you.
First, let's review how bed rollouts work on a popup camper.
There are two C-channels. One, usually brass colored but made of steel (or least very strong aluminum) is attached to the bed frame. This C-channel slides between two UHMW blocks, one a washer, which sits inside a C-channel slot, and one a spacer, that sits between the C-Channel and the bed frame. Each slot (there are four of them) is about 7 inches or so long and this is the length of travel a bed rollout travels in this C-channel. Not very much; just the last seven inches of travel when you pull a bed out.
This C-channel, affixed to the bed frame, sits inside a C-channel on each side of the pop-up camper. There is a roller at each end of the C-channel and the fixed bed-frame C-channel rolls through this camper C-channel.
When the bed is badly treated, two things are happening. First, the bed's C-channel cannot roll inside the camper's c-channel because, well, it's bent. Second, the bed's C-channel can't move because the slots are now a pinch point on the bolts because, you guessed it, they're bent.
If the camper user just jammed everything back inside the camper to get it home, you've got work ahead of you just to get things apart to fix the problem.
So, step one: Take all the canvas off on three sides so you can have access. This is fairly easy: unscrew the attach points along the roof inside the camper. Then slide the bottom out of the slotted groove. By the way, if you're thinking of replacing canvas and vinyl, this is as good a time as any.
Ideally, you could just unscrew the screws inside the camper holding the camper's C-frame to the camper, then -- with a friend -- lift the whole shebang out onto some saw horses to work on it more comfortably.
There's a problem, however, for many pop ups. There's a sink that folds over that blocks access to the C-channel on that side of the camper. You can't flip the sink up for access because there's a broken bed in the way.
So the only way to get things off is to try to separate the bed frame from its C-channel. And that presents another problem. Access to the bolts is blocked by the camper's C-channel.
The only solution is to remove the nuts inside the bed frame. That can be problematic because the bolts are going to want to turn. You have to lift the bed frame to apply sheer tension to the bolts as you take a 3/16" wrench remove the nuts, which probably aren't threaded on very tightly. Once that's done, you and a friend should be able to lift the bed frame and get it well out of the way. It plays very little role in getting this problem fixed.
With the bed gone, you might be able to flip that sink over and remove the C-channels from the camper to complete these steps on a workbench. Otherwise, you'll just have to work around the camper.
There are two Allen bolts on the end of the camper's C-channel which keeps the bed's C-channel from being pulled completely out of the camper. They need to be removed and there's probably little access to it except unscrewing the nut (which faces the outside of the camper) while, again, putting tension on the channel to keep the Allen bolt from turning inside. Then push the allen bolt out. Pick it up later.
Here's a tip: Grab a bunch of baggies and catalog EVERYTHING that you're taking off the camper: the screws to the camper C-channels, the UHMW washers and bolts and nuts, the retaining screws and various things from taking the vinyl/canvas off. Put every category in separate bags and mark it. Do this as you go so you don't lose anything. ALSO: mark the C-channel orientation as you remove each one: forward, inside, outside, left, right. Whatever.
Once you have the stop screws (Allen bolts) out. You'll have to take a block of wood, put it against the end of the bed's C-channel and use a 5 or 10 pound sledgehammer to force the bed's C-channel out of the camper's C-channel. Try to minimize damage to the end caps.
Once they are both free, it's time to fix them.
Now, you're going to have to resist the urge to just start beating on things with the sledgehammer. You have to take a minute to recognize how the whole thing works. Just straightening (you're never going to get it straight) isn't going to solve your problem. Because you actually have four problems. There are "pinch points" in the camper C-channel and a pinch point where the UHMW washers move within the bed's C-channel. The latter aren't going to budge. This fact has more to do with your stuck bed than anything else.
Why? Because when metal is distorted in one direction, it's being distorted somewhere else, too. A bend "flutes" a piece of metal, shrinking one side, and stretching the other.You can't "unstretch" metal.
So when you beat on a bend, all you're doing is moving the bend somewhere else.
This is a two-step fix.
The first goal is to get the bed's C-channel, to move effectively within the camper's C-channel.
This process actually does involve whacking it good. How can it not? So you want to use a piece of solid flat steel or wood, placed along the flange where the bend is and convince it to behave. When you do this, the odds are the "web" side (where the slots are located) are going to begin to bow. A little tapping here, a little tapping there. Repeat endlessly.
What we're going to do here is swap the two sides so the left C-channel will now be the right C-channel and the front of the C-channel is going to be the rear. Just remember that the open side of the C-channel faces out.
My theory here is that by reversing the locations, the weight of the bed later will help ease what's left of the bend (the bend is now in the opposite direction of its original orientation.
Place the bed C-channel inside the camper C-channel and push. It'll stop when it gets to a pinch point. Mark that point with a Sharpie and return to tapping it with a block of steel (wood) and hammer. Repeat this. If there's a twist, use two pipe wrenches to slightly untwist.
Continue doing this until the C-channel rolls effortlessly inside the camper C-channel. Be patient. Do it right. Don't accept "it's kind of good enough" because you have several pinch points and if you adopt that attitude, you're still going to have a bed that's hard to push and pull with an accumulation of pinch points that were sort of good enough individually but too difficult in total.
Once this is accomplished. It's time to solve the second problem: getting the bed's C-channel web to move between the UHMW washer and spacer. This is actually the harder of the two.
Take one of the 3/8" bolts you removed and place it in the slot nearest the bend. You'll notice it doesn't move. This is another example of how metal that's distorted affects many locations.
The first step is to open those slots up. If you take a string from one end of the C-channel to the next, and align it with the bottom of slots, you'll see how far off the slot nearest the bend is. That all had to be opened up. Continue trying to make the C-channel as straight as possible, testing constantly to be sure it still slides comfortably in and out of the camper C-channel.
Start filing the slot to open it up. It takes a LOT of filing. A Dremmel tool can work here but remember, a bolt is going to be sliding along that slot and if it's not smooth, it's going to be difficult to move it.
The goal here is to get the slots to align in a straight line.
This could take hours, but you really have no choice. Keep filing until the bolt sides all the way from one end of the slot to the other.
In this case, I also took a bucking bar (blocks of steel with different shapes) to help widen the slot, then flip the C-channel over and tap down the resulting distortion along the slot.
Once you have the bolt moving within the slot, it's time to test it on the bed frame.
Before you do that, doublecheck again that the bed C-channel still moves within the camper C-frame.
Stand the bed frame (it's heavy!) on its ends, put the thin UHMW washer inside the C-channel, insert a bolt, through the washer, the C-channel, the wider spacer and into the bed frame. Put the nut on finger tight. Do this on the slot closest to the bend.
Move the C-channel up and down. It probably moves fine and you think you're done.
You're not.
What will likely happen is when you put the second bolt and washers in, you'll see there's a still a pinch point because the slots are out of alignment. Take it off, and open up the slots even more -- more filing, more tapping with the bucking bar, more checking to make sure it still rolls within the camper C-frame.
Retest.
This, again, is one of those times when you want to be patient and do it right and not be satisfied until you are completely satisfied.
When you tighten the nut and bolt, don't have more than one thread showing on the nut. You don't want the washers to "pinch" the slot and make it difficult to move.
When you're satisfied and both C-channels are attached, have a friend help you move the unit to the end of the camper and place it on a couple of sawhorses.
Be sure the T-bars or other supports are in place, then lift the enter unit into the camper C-frame and test. You may be happy. You may want to make more adjustments. Your call.
Total time invested to this point: 10 hours, including several trips to the hardware store.
Don't forget to reinstall the Allen bolt "stops" in their position. You just pull the bed out and line up the access hole on the inside of the channel. Use a hex key (preferably one without the ball) to hold the bolt while you insert it. Then tighten down the nut.
Then reinstall the canvas and vinyl sides and vow never to allow this to happen again.
By the way, if you're an experimenter, you might want to try improving the design here by making that UHMW washer inside the C-channel a roller instead. So rather than having metal sliding between a washer and a spacer, it's actually rolling on the bottom of the C-channel. Less friction. Smoother ride.
I haven't done it yet but here's how I think it would work. Measure the distance between the center of the slot on the C-channel and the bottom of C-channel. Then buy a hole saw that fits in your drill equal to that size (or close to it). And use a 1/4" drill bit as a pilot.
By a hunk of UHMW. It's cheap. And use your band saw to slice off about a 1/2 to 1/4" slice. Anchor the resulting piece down, then use your hole saw to cut through it. Remove the piece inside the hole saw. There's your roller.
To be really spiffy, grab some soft 1/4 tubing, drill it out with a #12 drill bit, and cut off a piece equal to the width of the roller and then insert it into the roller hole. Now you have the bushing rotating on the bolt instead of the bolt rotating on the UHMW, making for an even smoother ride. Use 1/2" long 3/16" inch bolts in place of the existing bolts.
You'd have to remove the end cap to get the roller inside the C-channel. Those are riveted on but you can drill out the rivets and replace them later.
The Dutchmen was having a really good summer. People were having fun and it was popular, and was booked every weekend through most of the summer.
Unfortunately, that ended today when a renter returned the camper in an unusable condition.
I'd had a feeling about this particular renter because he didn't seem to know the pickup procedure and location, which is odd since prior to pickup day, people get at least three messages with the information and a copy of the camper guide, an incredibly helpful step-by-step guide.
If he didn't even read the pickup information, I thought, what are the odds he'll read the setup instructions properly?
So before he left on Friday, I said, "have one person read each step out loud, then you do it, and everything will be fine."
He chose not to.
The bed pullout was pulled out, and then the kids jumped on it. He didn't put the support posts in and without support, the rollout assembly bent on both sides. It would be near impossible to put back in and fold up for home.
But he did, jamming it back in, causing more damage, and ripping the canvas and vinyl sides of the camper.
The camper, for now, is essentially totalled unless I can get parts. And that's the problem with a 1999 camper; getting parts is near impossible.
Knowing this would be a lot of downtime, I set about contacting all of the people who had booked the camper to tell them I would have to cancel.
The work ahead is no fun; but ruining people's plans is the worst. Should I be able to get the camper going again, they'll all get free use of the camper next summer.
And maybe it'll work out. I've wanted to rip out the linoleum flooring and put in something better. Maybe this is the time to do it.
All of that, of course, depends on being able to find parts.
In more than a year of renting the camper, I haven't had to deduct anything out of a security deposit. It's not that I couldn't, it's just that sometimes things happen.
Take the table, for example. It also doubles as the frame for one of the extra beds. It came back from the first rental of the 2020 season like this.
Well, OK, it's a 20-year old table that wasn't in such great shape to begin with and I wasn't a big fan of the laminated look anyway. Plus, I like to build stuff. So I didn't even ask what happened. My guess is someone stood on the table as a step when it was in the "bed" position. Whatever.
Off to the store to buy a 4 x 8 foot sheet of plywood, which was no picnic getting it on top of the car, what with me being old and all. But I got it done.
Then, I cut out the new table top...
And sanded it down, stained it, and applied three coats of polyurethane. Much better.
In fact, it came out so nice that I may do remake the rear post table. We'll see.
The renters told me in advance that the table "didn't make it" and I appreciated that.
What they didn't reveal was a small hole in the roof, a serious injury on pop-ups because if water should get in there, it's the beginning of the end. But I found it, repaired it and painted it. It probably came from raising the camper into a tree branch.
So before cranking up the camper when setting up, look up! Even if it doesn't hit the branch, a gust of wind can do as much damage.
I didn't file a security deposit request with Outdoorsy on that, either.
This isn't to say don't worry about trashing the camper. Sometimes things can't be improved while being fixed. But the goal after each rental, is look for areas to make things better.
So if you have any ideas for doing so, don't hesitate to make note of them in the camper journal.
I wrote earlier about some of the maintenance I'm doing on the Dutchmen during the winter -- new wheel bearings and an electric water pump -- and I'm on track to complete most of the wish-list items I had during the off season.
This week, I installed the new LED lighting, replacing the last remaining incandescent and low-light fixture. I had installed one last summer, asking campers which they liked better, and the response was unanimous and overwhelming. So now the inside is like Target Field on a summer night!
I tried to find the same model I installed last year, but, unfortunately, it is no longer available. I liked the dimmable feature. This one has an option to use one or two lamps to adjust lights.
Of course, the best feature is it uses less electricity, which will come in handy for those on extended trips operating off battery. I'm looking forward to testing it out at Oshkosh this summer, although my planned week there has been cut short by the Twins' booking of a Guns and Roses concert on Friday July 24th. Ushers are required to work concerts.
One other improvement. When setting up the camper, it's important to get it pretty level, using the bubble gauges on the camper. Leveling it front to back is pretty simple. Just crank the jack at the front of the camper. But side to side can be time consuming. Some people use wood under the wheels for example, which can be problematic, and requires you to haul a hunk of wood on your trip.
And putting jacks under the corners doesn't work because it puts a twist in the camper frame, which makes the door hard to close.
I found this solution which should allow you to level the camper lickity split. It goes around the wheel on the low side like a tire chock. And a racheting wrench is used to raise the tire. Fast and simple. I'll update the set-up instructions to make the change.
Yes, I realize none of this is particularly sexy news. But I hope it shows the amount of care I put into making your camping experience as enjoyable as possible, and how your rental fee is being put immediately back into that effort.